Red Hat Linux Full intsallation with Pictures
Red
Hat Linux 9
Install
Using the CD-ROM
There
are several methods that can be used to install Red Hat Linux.
Installing
from a CD-ROM requires that you have purchased a Red Hat Linux 9 product, or
you have a Red Hat Linux CD-ROM, and you have a CD-ROM drive. Most new
computers will allow booting from the CD-ROM. If your system will support
booting from the CD-ROM, it is an easy way to begin a local CD-ROM
installation.
Your
BIOS may need to be changed to allow booting from your CD-ROM drive. For more
information about changing your BIOS.
Usually,
Red Hat Linux is installed on its own disk partition or set of partitions, or
over another installation of Linux.
|
Warning
|
|
|
|
Installing
Red Hat Linux over another installation of Linux (including Red Hat Linux)
does not preserve any information (files or data) from a prior
installation. Make sure you save any important files! To preserve the current
data on your existing system, you should back up your data and/or consider
performing an upgrade instead.
|
The
following installation types are available:
Personal
Desktop
A personal desktop installation is most appropriate if you
are new to the world of Linux, and would like to give it a try. This
installation will create a system for your home, laptop, or desktop use. A graphical
environment will be installed.
Workstation
A workstation installation is most appropriate if you would
like a graphical desktop environment, as well as software development tools.
Server
A server installation is most appropriate if you would like
your system to function as a Linux-based server, and you do not want to heavily
customize your system configuration.
Custom
A custom installation allows you the greatest flexibility
during your installation. You choose your boot loader, which packages you want,
and more. Custom installations are most appropriate for those users more
familiar with Red Hat Linux installations and for those afraid of losing
complete flexibility.
Upgrade
If you already have a version of Red Hat Linux (6.2 or
greater) running on your system and you want to quickly update to the latest
packages and kernel version, then an upgrade is most appropriate for you.
These
classes give you the option of simplifying the installation process (with some
potential for loss of configuration flexibility), or retaining flexibility with
a slightly more complex installation process. Next, take a detailed look at
each class, so you can see which one is right for you.
This
topic explains how to perform a custom installation of Red Hat Linux from the
CD-ROM, using the graphical, mouse-based installation program. The following
topics are discussed:
- Becoming
familiar with the installation program's user interface
- Starting the
installation program
- Selecting an
installation method
- Configuration
steps during the installation (language, keyboard, mouse, partitioning,
etc.)
- Finishing the
installation
Starting the Installation Program
·
To
start the installation, you must first boot the installation program. Please
make sure you have all the resources you will need for the installation.
Selecting an Installation Method
·
What
type of installation method do you wish to use? The following installation
methods are available:
·
CD-ROM
·
If
you have a CD-ROM drive and the Red Hat Linux CD-ROMs, you can use this method.
You will need a boot diskette or a bootable CD-ROM. A PCMCIA driver diskette
may also be used.
·
Hard
Drive
·
If
you have copied the Red Hat Linux ISO images to a local hard drive, you can use
this method. You will need a boot diskette. A PCMCIA driver diskette may also
be used.
·
NFS
Image
·
If
you are installing from an NFS server using ISO images or a mirror image of Red
Hat Linux, you can use this method. You will need a network driver diskette. A
PCMCIA driver diskette may also be used.
·
FTP
·
If
you are installing directly from an FTP server, use this method. You will need
a network driver diskette. A PCMCIA driver diskette may also be used.
·
HTTP
·
If
you are installing directly from an HTTP (Web) server, use this method. You
will need a network driver diskette. A PCMCIA driver diskette may also be used.
Installing from CD-ROM
To install Red Hat Linux from a CD-ROM, choose the CD-ROM option from the boot loader screen and select OK. When prompted, insert the Red Hat Linux CD into your CD-ROM drive (if you did not boot from the CD). Once the CD is in the CD-ROM drive, select OK, and press [Enter].The installation program will then probe your system and attempt to identify your CD-ROM drive. It will start by looking for an IDE (also known as an ATAPI) CD-ROM drive. If found, you will continue to the next stage of the installation process.
Welcome to Red Hat Linux
The Welcome screen does not prompt you for any input. Please read over the help text in the left panel for additional instructions and information on where to register your Red Hat Linux product.Please notice the Hide Help button at the bottom left corner of the screen. The help screen is open by default. If you do not want to view the help information, click on Hide Help to minimize the help portion of the screen.
Click on the Next button to continue.
Language Selection
Using your mouse, select the language you would prefer to use for the installation. Selecting the appropriate language will also help target your time zone configuration later in the installation. The installation program will try to define the appropriate time zone based on what you specify on this screen.
Once you select the appropriate language, click next to continue.
Keyboard Configuration
Using your mouse, select the correct layout type (for example, U.S. English) for the keyboard you would prefer to use for the installation and as the system default.Once you have made your selection, click Next to continue.

Mouse Configuration
Choose the correct mouse type for your system. If you cannot find an exact match, choose a mouse type that you are sure is compatible with your system.To determine your mouse's interface, follow the mouse cable back to where it plugs into your system and use the following diagrams. If you are installing Red Hat Linux on a laptop computer, in most cases the pointing device will be PS/2 compatible.
If you cannot find a mouse that you are sure is compatible with your system, select one of the Generic entries, based on your mouse's number of buttons, and its interface.
If you have a PS/2, USB, or Bus mouse, you do not need to pick a port and device. If you have a serial mouse, choose the correct port and device that your serial mouse is on.
The Emulate 3 buttons checkbox allows you to use a two-button mouse as if it had three buttons. In general, the graphical interface (the X Window System) is easier to use with a three-button mouse. If you select this checkbox, you can emulate a third, "middle" button by pressing both mouse buttons simultaneously.

Choosing to Upgrade or Install
The Upgrade Examine screen appears automatically if the installation program detects a prior version of Red Hat Linux on your system.If you would like to perform an upgrade, select perform an upgrade of an existing installation.
Be sure to select Customize packages to be upgraded if you would to have more control over which packages are upgraded on your system.
To perform a new installation of Red Hat Linux on your system, select perform a new Red Hat Linux installation and click next.

Installation Type
Choose the type of installation you would like to perform. Red Hat Linux allows you to choose the installation type that best fits your needs. Your options are Personal Desktop, Workstation, Server, Custom, and Upgrade.
Disk Partitioning Setup
Partitioning allows you to divide your hard drive into isolated sections, where each section behaves as its own hard drive. Partitioning is particularly useful if you run more than one operating system.On this screen, you can choose to perform automatic partitioning, or manual partitioning using Disk Druid.
Automatic partitioning allows you to perform an installation without having to partition your drive(s) yourself. If you do not feel comfortable with partitioning your system, it is recommended that you do not choose to partition manually and instead let the installation program partition for you.
To partition manually, choose the Disk Druid partitioning tool.

Automatic
Partitioning
Automatic
partitioning allows you to have some control concerning what data is removed
(if any) from your system. Your options are:
- Remove all Linux
partitions on this system — select this option to remove
only Linux partitions (partitions created from a previous Linux
installation). This will not remove other partitions you may have on your
hard drive(s) (such as VFAT or FAT32 partitions).
- Remove all
partitions on this system — select this option to remove
all partitions on your hard drive(s) (this includes partitions created by
other operating systems such as Windows 9x/NT/2000/ME/XP or NTFS
partitions).
- Keep all
partitions and use existing free space — select this option to retain
your current data and partitions, assuming you have enough free space
available on your hard drive(s).

Using
your mouse, choose the hard drive(s) on which you want Red Hat Linux to be
installed. If you have two or more hard drives, you can choose which hard
drive(s) should contain this installation. Unselected hard drives, and any data
on them, will not be touched.
To
review and make any necessary changes to the partitions created by automatic
partitioning, select the Review option. After selecting Review
and clicking Next to move forward, you will see the partitions created
for you in Disk Druid. You will also be able to make modifications to
these partitions if they do not meet your needs.
Click
next once you have made your selections to proceed.
Boot
Loader Configuration
In
order to boot the system without a boot diskette, you usually need to install a
boot loader. A boot loader is the first software program that runs when a
computer starts. It is responsible for loading and transferring control to the
operating system kernel software. The kernel, in turn, initializes the rest of
the operating system.
The
installation program provides two boot loaders for you to choose from, GRUB and
LILO.
GRUB
(GRand Unified Bootloader), which is installed by default, is a very powerful
boot loader. GRUB can load a variety of free operating systems, as well as
proprietary operating systems with chain-loading (the mechanism for loading
unsupported operating systems, such as DOS or Windows, by loading another boot
loader).
LILO
(LInux LOader) is a versatile boot loader for Linux. It does not depend on a
specific file system, can boot Linux kernel images from floppy diskettes and
hard disks, and can even boot other operating systems.

If
you do not want to install GRUB as your boot loader, click Change boot
loader. You can then choose to install LILO or choose not to install a boot
loader at all.
If
you already have a boot loader that can boot Linux and do not want to overwrite
your current boot loader, or if you plan to boot the system using boot
diskettes, choose Do not install a boot loader by clicking on the Change
boot loader button.
Advanced Boot Loader Configuration
Now
that you have chosen which boot loader to install, you can also determine where
you want the boot loader to be installed. You may install the boot loader in
one of two places:
The
master boot record (MBR)
This is the recommended place to install a boot loader,
unless the MBR already starts another operating system loader, such as System
Commander. The MBR is a special area on your hard drive that is automatically
loaded by your computer's BIOS, and is the earliest point at which the boot
loader can take control of the boot process. If you install it in the MBR, when
your machine boots, GRUB (or LILO) will present a boot prompt. You can then
boot Red Hat Linux or any other operating system that you have configured the
boot loader to boot.
The
first sector of your boot partition
This is recommended if you are already using another boot
loader on your system. In this case, your other boot loader will take control
first. You can then configure that boot loader to start GRUB (or LILO), which
will then boot Red Hat Linux.

If
your system will use only Red Hat Linux, you should choose the MBR. For systems
with Windows 95/98, you should also install the boot loader to the MBR so that
it can boot both operating systems.
Click
the Change Drive Order button if you would like to rearrange the drive
order or if your BIOS does not return the correct drive order. Changing the
drive order may be useful if you have multiple SCSI adapters, or both SCSI and
IDE adapters, and you want to boot from the SCSI device.
The
Force LBA32 (not normally required) option allows you to exceed the 1024
cylinder limit for the /boot partition. If you have a system which
supports the LBA32 extension for booting operating systems above the 1024
cylinder limit, and you want to place your /boot partition above
cylinder 1024, you should select this option.
Network
Configuration
If
you have a network device and you have not already configured your networking
(such as supplying a network driver diskette you created and entering in your
network information as prompted), you now have the opportunity to do so.

The
installation program will automatically detect any network devices you have and
display them in the Network Devices list.
Once
you have selected a network device, click Edit. From the Edit
Interface pop-up screen, you can choose to configure the IP address and Net
mask of the device via DHCP (or manually if DHCP is not selected) and you can
choose to activate the device at boot time. If you select Activate on boot,
your network interface will be started when you boot. If you do not have DHCP
client access or you are unsure what to provide here, please contact your
network administrator.

Firewall Configuration
Red
Hat Linux offers firewall protection for enhanced system security. A firewall
exists between your computer and the network, and determines which resources on
your computer remote users on the network can access. A properly configured
firewall can greatly increase the security of your system.

Choose
the appropriate security level for your system.
High
Medium
No Firewall
Language
Support Selection
You
can install and support multiple languages for use on your system.
You
must select a language to use as the default language. The default language
will be used on the system once the installation is complete. If you choose to
install other languages during this installation, you can change your default
language after the installation.
If
you are only going to use one language on your system, selecting only that
language will save significant disk space. The default language is the language
you selected to use during the installation.

Time
Zone Configuration
You
can set your time zone by selecting your computer's physical location or by
specifying your time zone's offset from Universal Time, Coordinated (UTC).
Notice
the two tabs at the top of the screen. The first tab allows you to configure
your time zone by your location.
On
the interactive map, you can also click on a specific city, which is marked by
a yellow dot; a red X will appear indicating your selection. You can
also scroll through a list and choose a time zone.
The
second tab allows you to specify a UTC offset. The tab displays a list of
offsets to choose from, as well as an option to set daylight saving time.

On
both tabs, you can select System Clock uses UTC. Please select this if
you know that your system is set to UTC.
Set
Root Password
Setting
up a root account and password is one of the most important steps during your
installation. Your root account is similar to the administrator account used on
Windows NT machines. The root account is used to install packages, upgrade
RPMs, and perform most system maintenance. Logging in as root gives you
complete control over your system.


Use
the root account only for system administration. Create a non-root account for
your general use and su - to root when you need to fix something
quickly. These basic rules will minimize the chances of a typo or an incorrect
command doing damage to your system.
Package
Group Selection
After
your partitions have been selected and configured for formatting, you are ready
to select packages for installation.
Unless
you choose a custom installation, the installation program will automatically
choose most packages for you.
For
example, if you were to perform a Personal Desktop installation, you may see a
screen such as this:

To
select packages individually, check the Customize the set of packages to be
installed checkbox. You can select package groups, which group components
together according to function (for example, X Window System and Editors),
individual packages, or a combination of the two.
To
select a component, click on the checkbox beside it.

Select
each component you wish to install. Selecting everything (at the end of
the component list) during a custom installation installs all packages included
with Red Hat Linux.
Once
a package group has been selected, click on Details to view which
packages will be installed by default and to add or remove optional packages
from that group.

To
select packages individually, check the Select Individual Packages box
at the bottom of the screen.
After
selecting the components you wish to install, you can select or deselect
individual packages using your mouse.
You
can choose to view the individual packages in Tree View or Flat View.
Tree
View
allows you to see the packages grouped by application type.
Flat
View
allows you to see all of the packages in an alphabetical listing on the right
of the screen.
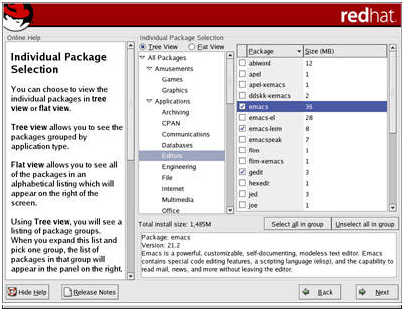
Using
Tree View, you see a listing of package groups. When you expand this
list (by double-clicking on the folder arrow beside a package group name) and
pick one group, the list of packages in that group appears in the panel on the
right. Flat View allows you to see all of the packages in an
alphabetical listing on the right of the screen.
To
sort packages alphabetically, click on the Package tab. To sort packages
by size, click on the Size (MB) tab.
To
select an individual package, double-click the checkbox beside the package
name. A check mark in the box means that a package has been selected.
For
more information about a specific package, click on the individual package
name. The package information will appear at the bottom of the screen.
You
can also select or deselect all packages listed within a particular group, by
clicking on the Select all in group or Unselect all in group
buttons.
Many
software packages, in order to work correctly, depend on other software
packages that must be installed on your system. For example, many of the
graphical Red Hat system administration tools require the python and pythonlib packages. To make
sure your system has all the packages it needs in order to be fully functional,
the installation program checks these package dependencies each time you
install or remove software packages.
If
any package requires another package which you have not selected to install,
the program presents a list of these unresolved dependencies and gives you the
opportunity to resolve them.
The
Unresolved Dependencies screen appears only if you are missing packages
that are needed by the packages you have selected. At the bottom of the screen,
under the list of missing packages, an Install packages to satisfy
dependencies checkbox is selected by default. If you leave this checked,
the installation program will resolve dependencies automatically by adding all
required packages to the list of selected packages.

If
you do not wish to install packages that require other packages, select Do
not install packages that have dependencies.
To
install only the packages you have selected and leave the dependencies
unresolved, select Ignore package dependencies.
Preparing
to Install
You
should now see a screen preparing you for the installation of Red Hat Linux.
For
your reference, a complete log of your installation can be found in /root/install.log once you reboot your
system.
Installing
Packages
At
this point there is nothing left for you to do until all the packages have been
installed. How quickly this happens depends on the number of packages you have
selected and your computer's speed.

Boot
Diskette Creation
To
create a boot diskette, insert a blank, formatted diskette into your diskette
drive and click Next.
It
is highly recommended that you create a boot diskette. If, for some reason,
your system were not able to boot properly using GRUB, LILO, or a third-party
boot loader, a boot diskette would enable you to properly boot your Red Hat
Linux system.
After
a short delay, your boot diskette will be created; remove it from your diskette
drive and label it clearly. Note that if you would like to create a boot
diskette after the installation, you will be able to do so. For more
information, please see the mkbootdisk man page, by typing man
mkbootdisk
at the shell prompt.
If
you do not want to create a boot diskette, make sure to select the appropriate
option before you click Next.
If
you boot your system with the boot diskette (instead of GRUB or LILO) , make
sure you create a new boot diskette whenever you make any changes to your
kernel (including the installation of a new kernel).

Video
Card Configuration
The
installation program will now present a list of video cards for you to choose
from.
If
you decided to install the X Window System packages, you now have the
opportunity to configure an X server for your system.
If
your video card does not appear on the list X may not support it. However, if you have
technical knowledge about your card, you may choose Unlisted Card and
attempt to configure it by matching your card's video chipset with one of the
available X servers.

Next,
enter the amount of video memory installed on your video card. If you are not
sure, please consult the documentation accompanying your video card. You will
not damage your video card by choosing more memory than is available, but the X
server may not start correctly if you do.
If
you decide that the values you have selected are incorrect, you can click the Restore
original values button to return to the suggested settings.
You
can also select Skip X Configuration if you would rather configure X
after the installation or not at all.
X
Configuration — Monitor and Customization
In
order to complete X configuration, you must configure your monitor and
customize your X settings.
The
installation program will present you with a list of monitors to select from.
From this list, you can either use the monitor that is automatically detected
for you, or choose another monitor.
If
your monitor does not appear on the list, select the most appropriate Generic
model available. If you select a Generic monitor, the installation
program will suggest horizontal and vertical sync ranges. These values are
generally available in the documentation which accompanies your monitor, or
from your monitor's vendor or manufacturer; please check your documentation to
make sure these values are set correctly.

The
horizontal and vertical ranges that the installation program suggests for the
selected monitor are also displayed below the list of monitors.
If
you decide that your monitor selection or the horizontal and vertical ranges
are incorrect, you can click the Restore original values button to
return to the original suggested settings.
Click
Next when you have finished configuring your monitor.
Choose
the correct color depth and resolution for your X configuration.
If
you are performing a custom or server installation, you can also choose whether
you want to boot your system into a graphical or text environment once the
installation is complete. Unless you have special needs, booting into a
graphical environment (similar to a Windows environment) is recommended. If you
choose to boot into a text environment, you will be presented with a command
prompt (similar to a DOS environment).
Personal
desktop and workstation installations will automatically boot into a graphical
environment.

Installation Complete
Congratulations! Your Red Hat Linux 9 installation is now complete!The installation program will prompt you to prepare your system for reboot. Remember to remove any installation media (diskette in the diskette drive or CD in the CD-ROM drive) if they are not ejected automatically upon reboot.
If you do not have a boot loader installed and configured, you will need to use the boot diskette you created during the installation now.
After your computer's normal power-up sequence has completed, you should see the graphical boot loader prompt, at which you can do any of the following things:
·
Press
[Enter] — causes the default boot entry to be booted.
·
Select
a boot label, followed by [Enter] — causes the boot
loader to boot the operating system corresponding to the boot label. (Press [?] or [Tab] at LILO's text mode
boot loader prompt for a list of valid boot labels.)
·
Do
nothing — after the boot loader's timeout period, (by default, five seconds)
the boot loader will automatically boot the default boot entry.
Do
whatever is appropriate to boot Red Hat Linux. You should see one or more
screens of messages scroll by. Eventually, you should see a login: prompt or a GUI login screen (if you
installed the X Window System and chose to start X automatically).
The first time you start your Red Hat Linux
machine, you will be presented with the Setup Agent, which guides you
through the Red Hat Linux configuration. Using this tool, you can set your
system time and date, install software, register your machine with Red Hat
Network, and more. The Setup Agent lets you configure your environment
at the beginning, so that you can get started using your Red Hat Linux system
quickly. For more information on using the Setup Agent, refer to the
chapter titled Getting Started in the Red Hat Linux Getting Started
Guide.
Happy Reading!
tags: hacking, cracking, hacking website, hacking facebook, hacking gmail, hacking tools, cracking, hacker, hacking tricks, hacking tips, hacking without software, hack wifi, linux, android, hacking tricks,free gprs,free internet,free software,notepad tricks, Ethical Hacking Tutorial,free sms,backtrack,bios,website hack,mobile hack,crack and serials, free call,web developing, fresher jobs,


No comments: